If you’re planning to start a career in automation testing, the first thing you need is a proper setup. Many beginners struggle with configuring tools correctly, which can slow down their learning.
In this complete guide, you’ll learn how to do a Java Selenium setup using Eclipse in a simple and practical way. Even if you’re new, you’ll be able to set up everything and run your first test smoothly.
Why Java Selenium Setup is Important
Before jumping into coding, having a clean and correct environment setup is essential. A proper setup helps you:
- Avoid unnecessary errors
- Save time during development
- Run tests smoothly
- Focus on learning automation instead of fixing setup issues
Java with Selenium is one of the most widely used combinations in automation testing, which makes it a great choice for beginners.
Prerequisites for Java Selenium Setup
Before you begin, make sure you have:
- A Windows, macOS, or Linux machine
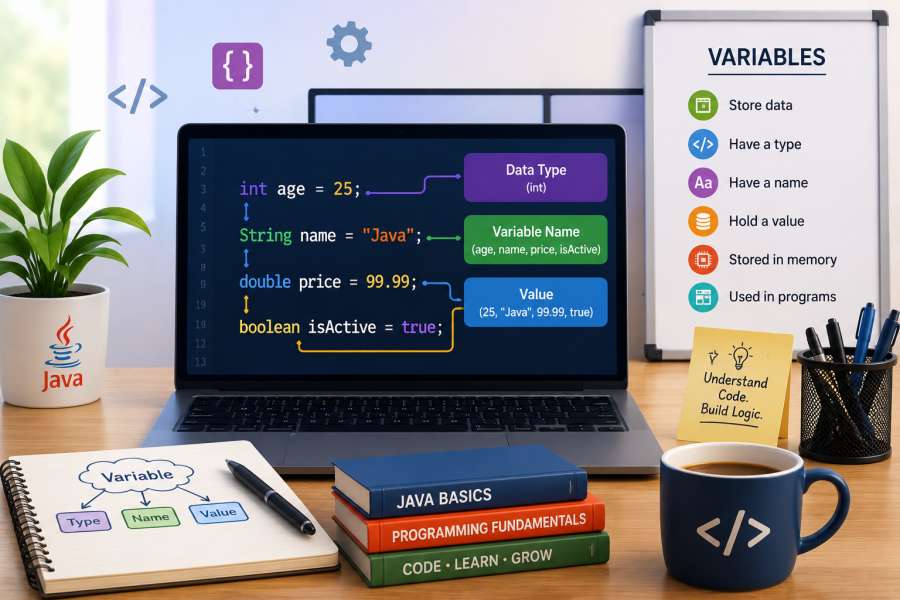
- Basic understanding of Java
- A system with active and stable internet connection
- Admin access to install software
You don’t need advanced knowledge—just the basics are enough to get started.
Step 1: Install Java (JDK)
Java is the foundation for running Selenium tests.
There are two ways to set up Java for Selenium: you can either install it separately from the official Oracle Corporation website, or Use modern Eclipse IDE that come with Java pre-installed.
Option A: Download and install java separately
- A Java development kit that includes the JRE (Java Runtime Environment) is required to write and run Java programs.
- Download and install the Java Development Kit (JDK) depending on whether you’re using Windows, Linux, or macOS from Oracle.
Steps: To Install java
1. Download java from Oracle

2. Double click on downloaded java file to install.

Set Environment Variables
After installation, you need to configure environment variables for Java.
Setting up Java system variables is important (imp) because it allows your operating system and various development tools to find the Java compiler (javac) and runtime (java) from any folder on your computer.
Steps: To set up Environment variable
1. Search for “Environment variable” in windows search

2. Click on “Environment Variables”

3. Click on “New” to add new system variable

4. Add new system variable
To find your installed java path redirect to – C:\Program Files\Java
If installed with default setting it will be the same just only you need to recheck with your downloaded version.

Name – JAVA_HOME And Value – C:\Program Files\Java\jdk-26.0.1

After adding detail click on OK
5. Now, double click on path to add value to path variable

6. Click on “New”

7. Add value to path – %JAVA_HOME%\bin

After adding details click on OK
Verify Java Installation
Open command prompt and type below command:
java -versionIf everything is set correctly, you will see the installed Java version

Option B: Download and install java with Eclipse IDE
Steps : To install java with Eclipse IDE
1. Download Eclipse installer and run.
2. While installing eclipse you will get an option to select java version.
3. Select java version you need and install.
Step 2: Install Eclipse IDE
Eclipse is one of the most popular tools for Java development and is widely used by automation testers.
Eclipse is a Java development platform for writing and running code.
1. Download Eclipse from their official page. Based on the OS, one can go with the required option.

2. This will download the Eclipse Installer. Once the download is complete, double-click the file to run it.

3. The installer will launch and prompt you to choose the setup type—select “Eclipse IDE for Java Developers.”

4. Next, choose the Java version you want to install on your system. If Java is already installed, select the existing Java path, then click Install.

5. Once the download is complete, launch Eclipse.

6. Create a new workspace or choose an existing one—this is where all your projects and files will be stored.


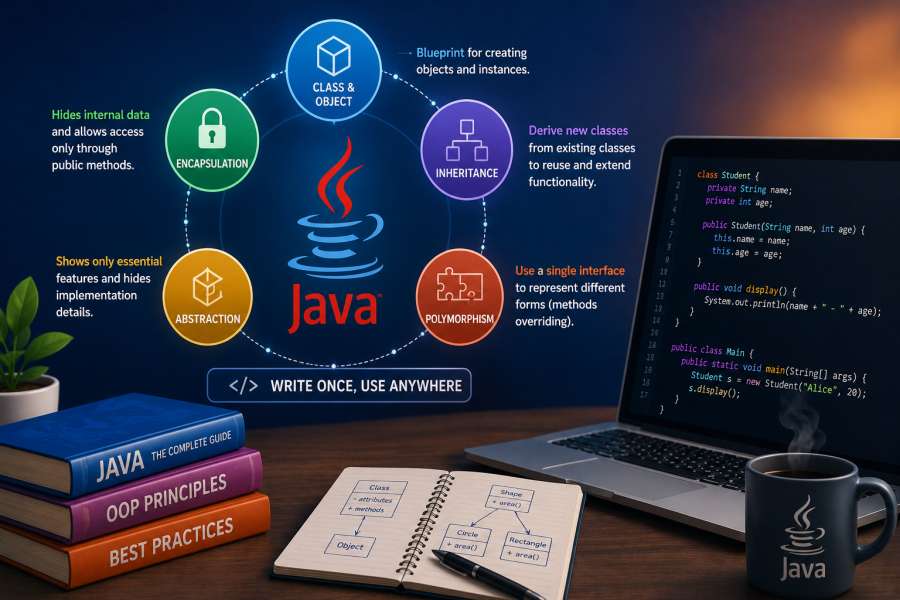
Step 3: Create a Java Project in Eclipse
Before creating a project, it’s important to understand the hierarchy of Java.

1. Now it’s time to create your first project.
- Open Eclipse
- Click on File → New → JavaProject
- Enter a project name like
SeleniumProject - Click Finish

2. Create a package within the project.


3. Create a Class within the Project.


Note: Make sure to delete the module-info.java file, as it may cause issues later.
Step 4: Add Selenium Client and WebDriver Language Bindings to Your Project
Selenium is the core library that allows you to automate browsers.
There are two ways to add Selenium:
Method 1: Using Maven (Recommended)
Maven makes dependency management very easy.
Maven POM
- POM stands for Project Object Model. The pom.xml file is the core configuration file of a Maven project.
- POM defines project metadata, dependencies, plugins, build configurations and other important details of a Maven project. It is represented by a pom.xml file.
- The pom.xml file is used because it acts as the single source of truth for a Maven project. It tells Maven what the project is, how it should be built, and which dependencies it needs.
The pom.xml file organizes your project by specifying:
- Project coordinates: such as
groupId,artifactId, andversionto uniquely identify your project. - Dependencies: external required libraries your project relies on.
- Build plugins: tools that automate tasks like compiling code or running tests.
- Project metadata: information about project like name, description, and developers.
Convert your Java project into a Maven project by following the steps below:
- Right-click your project
- Select Configure → Convert to Maven Project


- After converting java project to maven project
pom.xmlfile is automatically is get generated - Open the
pom.xmlfile

If you encounter errors in the pom.xml, follow the steps below to resolve them:
Locate the following parameter in the <project> tag (first line):
xsi:schemaLocation="https://maven.apache.org/POM/4.0.0 http://maven.apache.org/xsd/maven-4.0.0.xsd"Replace https with http, and the error should be resolved.
Add dependencies to pom.xml
You can add any required dependencies from the Maven Repository to the pom.xml file.
For Selenium, add the following dependency by creating a <dependencies> tag in your pom.xml
<dependencies>
    <dependency>
        <groupId>org.seleniumhq.selenium</groupId>
        <artifactId>selenium-java</artifactId>
        <version>4.21.0</version>
    </dependency>
</dependencies>
Save the file, and Maven will automatically download all required libraries from Maven Repository.
Method 2: Manual Setup
If you are not using Maven then you have to manually download and configure jar file with eclipse manually:
1. Download Selenium WebDriver JAR files

2. Extract the Selenium JAR files from the downloaded ZIP archive.

3. Right-click project → Build Path → Add External JARs

4. Go to the Libraries tab, select Classpath, and then click on Add External JARs.

5. Select all the extracted Selenium JAR files and click Open.

6. Click Apply and close

This method works, but it becomes difficult to manage in the long run, as you’ll need to repeat the same steps every time you add new JAR files.
Step 5: Write Your First Selenium Script
Now comes the exciting part—writing your first automation script.
Create a new Java class and add the following code:
import org.openqa.selenium.WebDriver;
import org.openqa.selenium.chrome.ChromeDriver;
public class FirstTest {
    public static void main(String[] args) {
        WebDriver driver = new ChromeDriver();
        driver.get("https://www.google.com");
        System.out.println("Page Title: " + driver.getTitle());
        driver.quit();
    }
}
Common Issues in Java Selenium Setup
Even with the correct steps, beginners may face a few common issues.
1. Java Not Recognized
If you see errors like “java is not recognized,” it means environment variables are not set correctly.
Solution: Recheck JAVA_HOME and PATH.
2. Missing Dependencies
If Selenium libraries are not added properly, your code will show errors.
Solution: Use Maven to avoid dependency issues.
Best Practices for Selenium Setup
To make your setup future-ready:
- Always use Maven for dependency management
- Organize your project structure properly
- Use version control tools like Git
- Avoid hardcoding paths (use configuration files later)
Conclusion
Setting up Java Selenium using Eclipse is the first and most important step in your automation testing journey. Once your environment is ready, you can start learning advanced concepts like locators, frameworks, and test design.
If you follow this guide step by step, you’ll have a fully working setup without confusion.
FAQs
Is Java Selenium setup difficult for beginners?
No, if you follow the right steps, it’s straightforward and beginner-friendly.
Can I use other IDEs instead of Eclipse?
Yes, you can use IntelliJ IDEA or VS Code, but Eclipse is widely used and beginner-friendly.
Do I need coding knowledge for Selenium?
Yes, basic Java knowledge is required to write automation scripts.